How to Restore Your Privacy on Facebook

Since posting about Facebook's latest privacy rollback, we've received emails asking how users can protect themselves, and for clarification about what happened. Here, then, is a quick guide to locking down the new Facebook.
First off, one big caveat: It is simply impossible to have the old Facebook experience with the old level of privacy. If you want the old level of privacy, you're going to have to give up some functionality; if you want all the old functionality, you're going to have to give up some privacy. Below, we detail what you'd need to do to maximize privacy, so you can decide for yourself whether to go down that road.
Remove your "connections," e.g. education and work, current city, likes and interests
Facebook is in the process of rolling out a new system of "connections" that publicly shares information whose disclosure you used to be able to control through privacy settings, "including your current city, hometown, education and work, and likes and interests."
The sharing of this information will happen after Facebook prompts you—if it hasn't already—to convert data entries in your profile into "connections" to pages representing various places, groups, interests, political causes, and so on. But unlike in the past, when you could choose to shield who saw your interest in, say, pot legalization, this information will now be public, and your account would be linked from the pot legalization interest page.
In short, as the Electronic Frontier Foundation put it, "Facebook removed its users' ability to control who can see their own interests and personal information"
To keep this information private, you need to opt out of the "connections" Facebook offers you. The relevant information will then be missing from the appropriate section of your profile, so you'll need to stuff it all into your free-form "Bio."
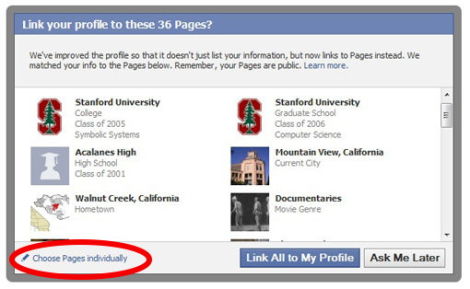
At some point when you visit your Facebook profile, you'll see the dialog below. Click on the far left button, "Choose pages individually:"

Then uncheck any "connections" you don't want made public. Make a note of these connections, since they'll be removed from your profile and you may want to add them to your "Bio" later.
Once you've opted out, you can restore any information you'd like to selectively share into the "bio" section of your profile, the free-form text area of your profile under your photo. Before you enter data there, make sure you're happy with the privacy settings for that section. Click on "Account" on the top right of your profile page, select "Privacy settings" from the drop-down, then "Profile Information." "Bio" privacy settings will be listed on the first line.
Prune — or utterly nuke — your apps
Facebook recently lifted some privacy restrictions on how outside developers handle Facebook data. Previously they could only retain said data for 24 hours, now they can hold on to the data as long as they like. Facebook used to prompt users before sharing data with a partner site, but, as VentureBeat points out, it will no longer do so for "special" partners like Yelp, Pandora and Microsoft. Also, some Facebook sharing that needed two or three pop-up dialogs to authorize now require just one.
The changes are even riskier than they appear, as ReadWriteWeb said: Now that non-Facebook websites are allowed to hoard Facebook user data, said sites will become inviting targets for hackers. And it's your Facebook data the hackers will be after. Of course, you have to worry about more than just computer crackers, since there's not much enforcement over how even authorized Facebook developers use the data they collect. If they want to mislead you and misappropriate your data, they can — and given the track record of Facebook's partners, they just might. If that happens, have fun suing for your privacy back.
Prevention is better than damage control, of course, and the one security measure at your disposal is to whittle or eliminate the outside apps you choose to share data with. Lifehacker's Kevin Purdy put together a nice guide on this, which we'll crib from here:
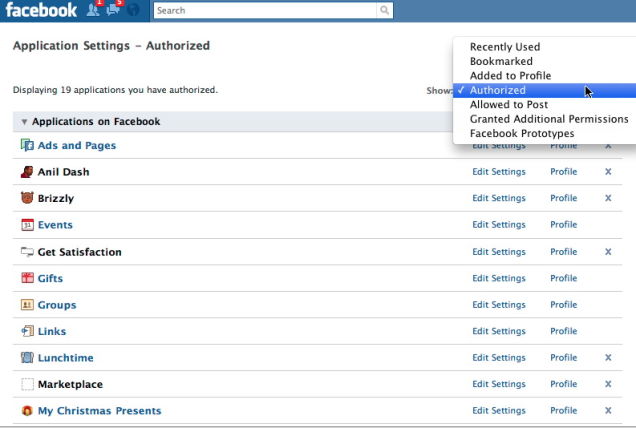
Go to "Account" at the top-right of your profile page. Select "Application settings" from the drop-down. Then from the "Show" menu select "Authorized." Click to enlarge:

Click the "X" next to any app you don't use, don't trust or otherwise want to remove. After clicking "X" you'll have to click "Remove" and then "Okay." For any app you choose to keep, you should probably review its privacy settings by clicking "Edit Settings" and the "Additional permissions" tab. Uncheck any sharing feature you're not comfortable with, although be aware this could break the app's Facebook functionality.
(Pic: Facebook CEO Mark Zuckerberg at his company's F8 developers conference yesterday. Getty Images.)
